User Payout Guide
A comprehensive guide to withdrawing your tokens and managing payout transactions on TradePoint.
1. Introduction
The Payout feature allows you to withdraw your token balances to external cryptocurrency wallets. Think of it as transferring money from your TradePoint account to your personal bank account - except instead of a bank account, you're sending cryptocurrency to your wallet.
What You Can Do
- Withdraw Tokens - Transfer your available token balances to your saved wallet addresses
- Track History - View all past and pending withdrawal transactions
- Multiple Networks - Withdraw to different blockchain networks (Ethereum, Polygon, BSC, etc.)
- Secure Process - Two-factor authentication protects every withdrawal
[!IMPORTANT]
Cryptocurrency transactions are irreversible. Once a withdrawal is processed and sent to the blockchain, it cannot be undone. Always double-check your addresses before withdrawing.
2. Prerequisites
Before you can make a withdrawal, you must complete these requirements:
Requirement 1: KYC Verification (Identity Verification)
Why Required: Financial regulations require platforms to verify user identities before allowing withdrawals.
Status: Your KYC must be Approved
How to Check:
- Go to Account Settings > Identity Verification
- Look for your KYC status
- If it says "Approved" ✅, you're good to go
- If it says "Under Review" ⏳ or "Rejected" ❌, you must complete/resubmit KYC
[!NOTE]
See the Step-by-Step: How to Complete KYC for detailed instructions on completing KYC verification.
Requirement 2: Two-Factor Authentication (2FA/TOTP)
Why Required: 2FA adds an extra security layer to protect your funds from unauthorized withdrawals.
Status: TOTP must be Enabled
How to Check:
- Go to Account Settings > Security
- Look for "Two-Factor Authentication" section
- If it says "Active" ✅, you're ready
- If it says "Inactive" ❌, you must set up 2FA
[!IMPORTANT]
You cannot make withdrawals without 2FA enabled. This is a mandatory security requirement.
[!NOTE]
See the 3. Two-Factor Authentication (2FA) for step-by-step 2FA setup instructions.
Requirement 3: Saved Withdrawal Addresses
Why Required: You can only withdraw to pre-verified addresses in your Address Book.
How to Add Addresses:
- Go to Account Settings > Manage Address Book
- Provide wallet address, network, and verification screenshot
- Verify with 2FA code
[!TIP]
Add your withdrawal addresses in advance to speed up the process when you're ready to withdraw.
[!NOTE]
See the 4. Address Book Management for detailed Address Book instructions.
Summary of Prerequisites
| Requirement | What You Need | Where to Complete |
|---|---|---|
| ✅ KYC Approved | Identity verification completed and approved | Account > Identity Verification |
| ✅ 2FA Enabled | Authenticator app set up and active | Account > Security |
| ✅ Saved Address | At least one verified withdrawal address | Account > Address Book |
When All Requirements Met:
- You can select tokens and addresses
- You can enter withdrawal amounts
- The "Withdraw" button will be active
If Requirements Not Met:
- Clicking form fields will show a modal explaining what's needed
- Links will guide you to complete missing requirements
3. Understanding Your Available Balance
What is Available Balance?
Your available balance is the amount of tokens you can withdraw right now. This is your actual balance from the platform's accounting system, reflecting:
- ✅ Tokens distributed to you and claimed
- ✅ Trading profits that have settled
- ✅ Vested tokens that are unlocked
- ❌ Excludes tokens locked in pending operations
- ❌ Excludes unclaimed tokens
- ❌ Excludes unvested tokens
- ❌ Excludes tokens currently in pending withdrawals
Where to See Your Balance
In the Payout Page:
- Navigate to Payout from the main menu
- Click the "Select Token" dropdown
- Each token shows its balance next to the name
Example:
USDT (Tether) (Balance: 1,500.000000)
ETH (Ethereum) (Balance: 0.500000)
After Selecting a Token:
-
Below the "Withdraw Amount" field, you'll see:
Available: 1,500.000000 USDT
[!NOTE]
The system automatically rounds down your balance to the token's display decimals for clarity. For example, if a token uses 6 decimal places, you'll see values like
1,500.123456(not1,500.12345678901234).
Only Tokens with Balance Are Shown
Important: The token dropdown only shows tokens where you have a positive balance.
If you don't see a token:
- You may have a zero balance for that token
- The token may not be configured for withdrawals yet
- Contact support if you believe you should have a balance
4. Withdrawal Process
Follow these steps to withdraw your tokens to an external wallet.
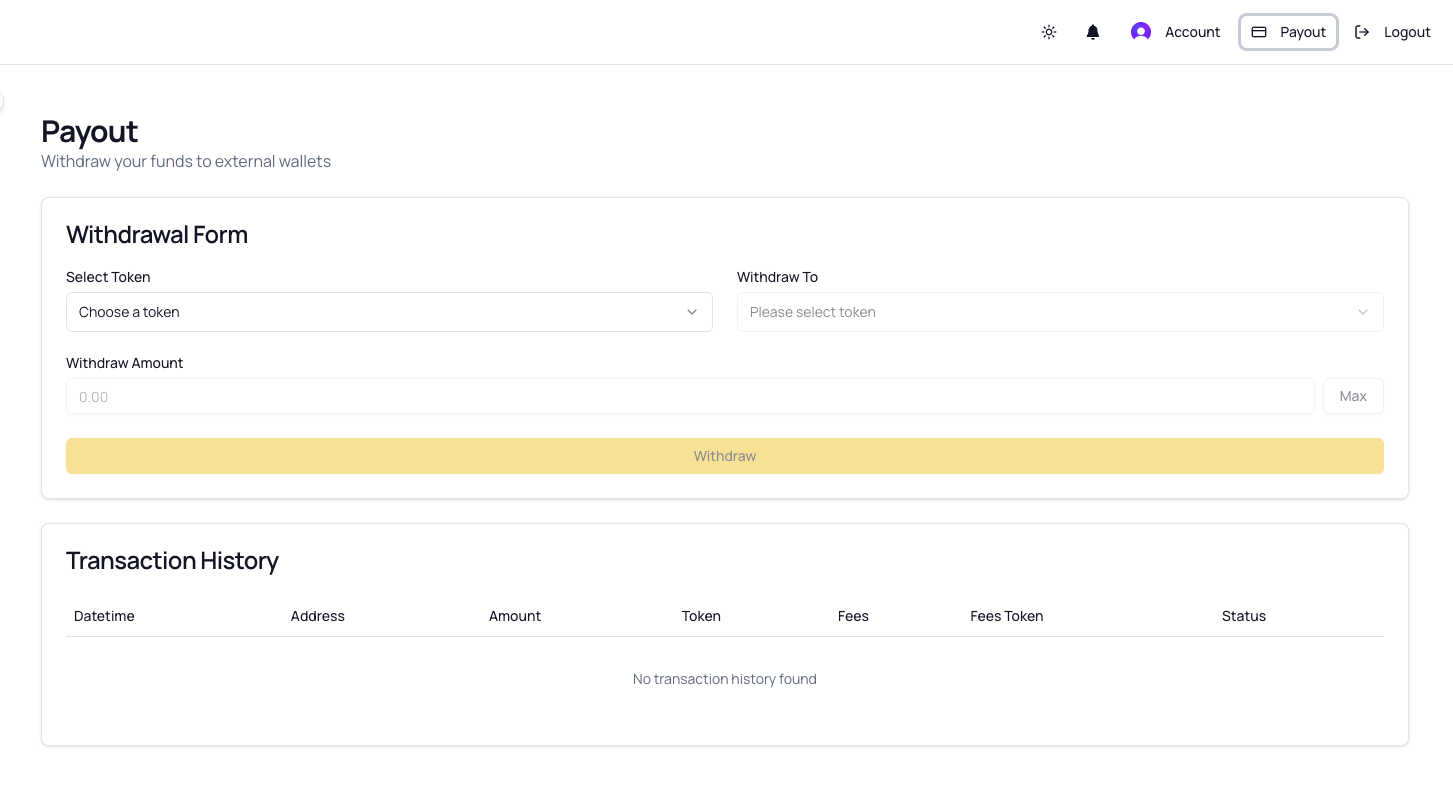
Step 1: Navigate to Payout Page
- Log into your TradePoint account
- From the main menu, click "Payout"
- You'll see the Withdrawal Form and Transaction History
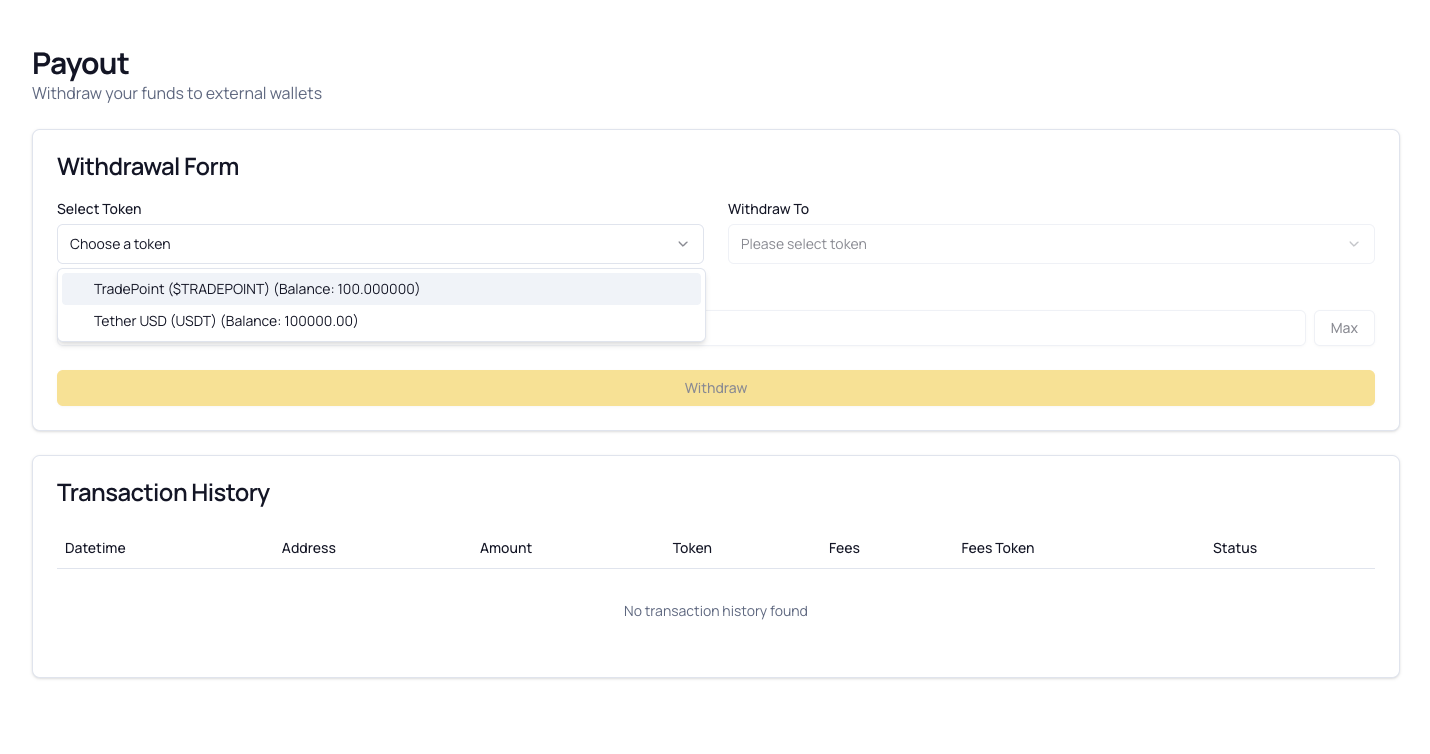
Step 2: Select Your Token
- Click the "Select Token" dropdown
- You'll see a list of all tokens you have with available balances
- Each token shows:
- Token Name (e.g., "Tether")
- Token Symbol (e.g., "USDT")
- Your Balance (e.g., "Balance: 100000.00")
- Click on the token you want to withdraw
[!TIP]
If you don't see any tokens, you either have zero balances or need to wait for token distributions.
Step 3: Select Withdrawal Address
- Click the "Withdraw To" dropdown
- You'll see your saved addresses from the Address Book
- Important: Only addresses compatible with the selected token's networks are shown
Address Format:
My MetaMask Wallet - 0x742d35...f44e (ETH)
└── Label ─────────┘  └─ Address ──┘ └Network┘
What Each Part Means:
- Label: The nickname you gave this address
- Address: The wallet address (shortened for display)
- Network: The blockchain network (e.g., ETH for Ethereum, BSC for Binance Smart Chain)
Special Options:
- "New Address" - Opens the Address Book in a new tab to add a new address
- If you see "No compatible addresses," your saved addresses don't support the selected token's networks
[!CAUTION]
Network Compatibility is Critical
If you select USDT on Ethereum, you can only withdraw to Ethereum addresses. Sending to a Binance Smart Chain address (even if it's the same address format) will result in permanent loss of funds.

Step 4: Review Blockchain Information
After selecting an address, the "Blockchain" field auto-fills with the network information.
Example:
Blockchain: Ethereum (ETH)
This is disabled (greyed out) because it's automatically determined by your selected address.
Why This Matters:
- Confirms you're withdrawing to the correct network
- Helps prevent sending to wrong blockchain (which causes fund loss)
- The withdrawal fee is based on this network
Step 5: Enter Withdrawal Amount
- Click in the "Withdraw Amount" field
- Type the amount you want to withdraw
- Or click the "Max" button to withdraw your entire available balance
Important Validation Rules:
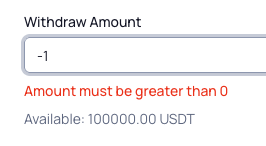
✅ Amount must be:
- Greater than zero
- Less than or equal to your available balance
- Greater than the platform withdrawal fee
- Result in a positive amount after fees are deducted
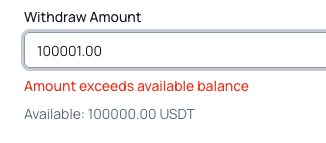
❌ Common Errors:
Error: "Amount exceeds available balance"
- Solution: Reduce the amount or click "Max" to use the maximum
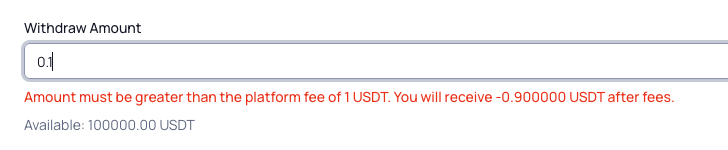
Error: "Amount must be greater than the platform fee of X USDT"
- Solution: The withdrawal amount must exceed the fee so you receive something after the fee is deducted
Example Scenario:
Your Balance: 100 USDT
Withdrawal Fee: 5 USDT
Minimum Valid Amount: 5.000001 USDT (slightly more than fee)
Maximum Valid Amount: 100 USDT

If you enter 100 USDT:
  You will receive: 95 USDT (100 - 5 fee)
[!TIP]
Always check how much you'll receive after fees before confirming. The confirmation screen will show you the exact amount.
Step 6: Review and Click Withdraw
Before clicking "Withdraw", verify:
| Check | What to Verify |
|---|---|
| ✅ Correct Token | Is this the token you want to send? |
| ✅ Correct Address | Is this the right destination wallet? |
| ✅ Correct Network | Does the network match your wallet? |
| ✅ Correct Amount | Is the amount what you intended? |
| ✅ Fees Understood | Do you know how much you'll receive after fees? |
When Ready:
- Click the "Withdraw" button
- A confirmation modal will appear
[!WARNING]
This is your last chance to review before the withdrawal is requested. Double-check everything!
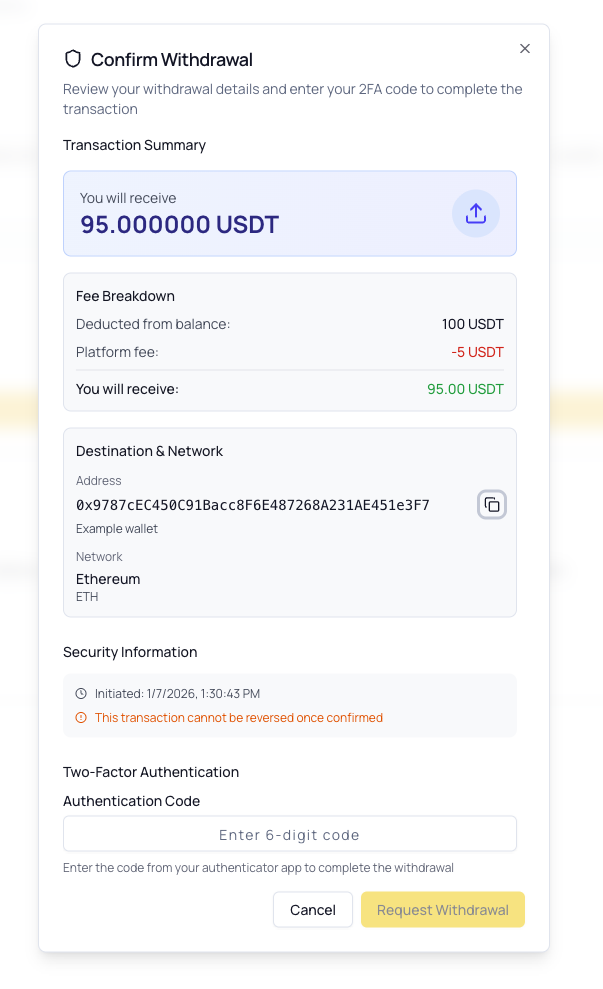
Step 7: Review Transaction Summary
A confirmation modal will appear showing:
Transaction Summary Card:
┌────────────────────────────────────────┐
│  You will receive                      │
│  95.000000 USDT                        │
│                                        │
│  Fee Breakdown:                        │
│  Deducted from balance: 100.000 USDT   │
│  Platform fee:          -5.000 USDT    │
│  ──────────────────────────────────    │
│  You will receive:      95.000 USDT    │
└────────────────────────────────────────┘

Destination & Network:
  Address: 0x742d35Cc6634C0532925a3b844Bc454e4438f44e
  Label: My MetaMask Wallet
  Network: Ethereum (ETH)

Security Information:
  ⏱ Initiated: Dec 20, 2024 2:30:45 PM
  ⚠ This transaction cannot be reversed once confirmed
What to Check:
- "You will receive" - Confirm this is the amount you expect (after fees)
- Destination Address - Verify this is your correct wallet address
- Network - Confirm the blockchain is correct
- Fee Breakdown - Understand what's being deducted
Step 8: Enter 2FA Code
At the bottom of the confirmation modal:
- Open your authenticator app on your phone
- Find the TradePoint entry
- You'll see a 6-digit code (e.g.,
123 456) - Type this code into the "Authentication Code" field
- Click "Request Withdrawal"
Code Requirements:
- Must be exactly 6 digits
- Must be the current code (changes every 30 seconds)
- Must be entered before it expires
If Code Expires While Typing:
- Wait for the new code to appear
- Enter the new code instead
[!TIP]
If the code is about to expire (timer almost at zero), wait for the next code to avoid having to re-enter it.
Error Messages:
❌ "Invalid or expired code"
- Cause: Code was typed incorrectly or expired
- Solution: Wait for the next code and try again
❌ "TOTP verification failed"
- Cause: Technical issue with 2FA system
- Solution: Ensure your phone's time is set to automatic, or contact support
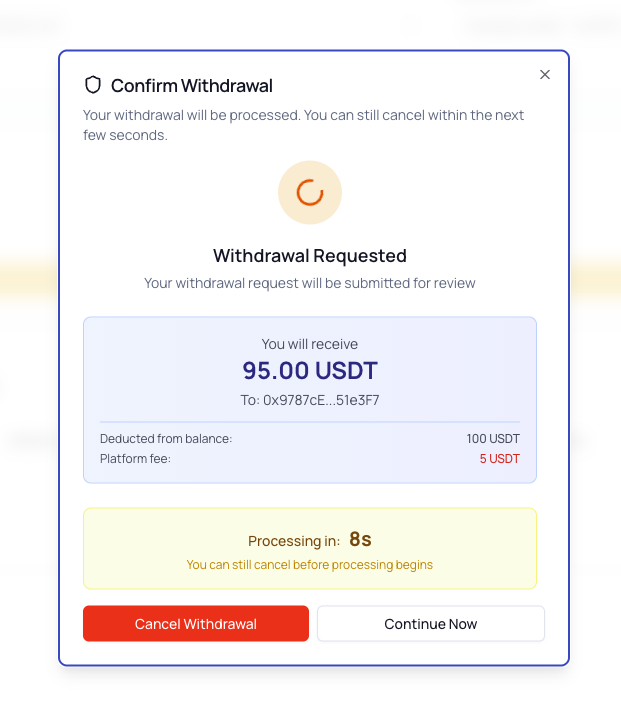
Step 9: Countdown and Cancellation Window
After entering a valid 2FA code:
-
A 10-second countdown timer appears
-
You'll see:
┌────────────────────────────────────┐
│  Withdrawal Requested              │
│                                    │
│  You will receive:                 │
│  95.000000 USDT                    │
│  To: 0x742d35...f44e               │
│                                    │
│  Processing in: 8s                 │
│  You can still cancel              │
│                                    │
│  [Cancel Withdrawal] [Continue Now]│
└────────────────────────────────────┘
Your Options:
Option 1: Wait for Countdown (Do Nothing)
- The withdrawal will automatically submit when timer reaches 0
- You have the full 10 seconds to change your mind
Option 2: Cancel Withdrawal
- Click "Cancel Withdrawal" button
- Your withdrawal request is cancelled
- No funds are deducted
- You return to the withdrawal form
Option 3: Continue Now
- Click "Continue Now" button
- Skips the countdown and submits withdrawal immediately
- Use this if you're certain and don't want to wait
[!IMPORTANT]
This is your final opportunity to cancel the withdrawal. Once the countdown reaches zero or you click "Continue Now," the withdrawal is submitted and enters the processing queue.
Step 10: Withdrawal Submitted
Once the countdown completes or you click "Continue Now":
- Success message appears: "Withdrawal request submitted"
- Your balance updates immediately - The withdrawn amount is deducted
- Transaction appears in History with status "Pending"
- Form resets - Ready for another withdrawal if needed
What Happens Next:
- Withdrawal is Queued ⏳
- Your withdrawal enters the admin review queue
- Status: Pending
- Funds are locked and cannot be used
- Admin Reviews Request 👤
- Platform administrators verify the withdrawal
- They check for compliance and fraud prevention
- This typically takes 1-3 business days
- Admin Processes Withdrawal ✅
- Admin clicks "Process Withdrawal" in their dashboard
- Transaction is sent to the blockchain
- Status changes to Completed
- You Receive Your Tokens 🎉
- Tokens arrive in your external wallet
- Blockchain confirmations may take a few minutes to hours depending on network congestion
- You can track the transaction on a blockchain explorer (if transaction hash is provided)
[!NOTE]
Processing Time: Withdrawals typically complete within 1-3 business days, but this can vary based on admin availability and compliance checks.
5. Understanding Withdrawal Fees
What Are Withdrawal Fees?
Withdrawal fees cover:
- Platform Processing Costs - Administrative and compliance review
- Network Transaction Fees - Gas fees paid to blockchain miners/validators
- Operational Overhead - Security monitoring and fraud prevention
How Fees Are Calculated
Withdrawal fees are:
- ✅ Fixed per token per network - Same fee regardless of amount withdrawn
- ✅ Displayed upfront - You see the fee before confirming
- ✅ Deducted from your withdrawal - You receive
Amount - Fee - ✅ Network-specific - Same token on different networks may have different fees
Example:
USDT on Ethereum:     Fee = 5 USDT
USDT on BSC:          Fee = 2 USDT
USDT on Polygon:      Fee = 1 USDT

Same token, different networks, different fees!
Where to See Fees
Before Withdrawing:
- Fees are shown in the confirmation modal after entering your 2FA code
Fee Breakdown Display:
Fee Breakdown:
  Deducted from balance: 100.000 USDT
  Platform fee:          -5.000 USDT
  ──────────────────────────────────
  You will receive:      95.000 USDT
In Transaction History:
- Each completed withdrawal shows the fee amount in the "Fees" column
Fee Examples by Network
Hypothetical Fee Structure (check current fees in platform):
| Token | Network | Typical Fee | You Withdraw | You Receive |
|---|---|---|---|---|
| USDT | Ethereum (ERC-20) | 10 USDT | 100 USDT | 90 USDT |
| USDT | BSC (BEP-20) | 2 USDT | 100 USDT | 98 USDT |
| USDT | Polygon | 1 USDT | 100 USDT | 99 USDT |
| ETH | Ethereum | 0.005 ETH | 1 ETH | 0.995 ETH |
| MATIC | Polygon | 1 MATIC | 100 MATIC | 99 MATIC |
[!TIP]
Choose Lower-Fee Networks When Possible
If your token is available on multiple networks (like USDT on Ethereum, BSC, and Polygon), consider using a lower-fee network like Polygon or BSC to save on costs.
[!CAUTION]
Make sure your destination wallet supports the network you choose! Sending USDT on BSC to an Ethereum-only wallet will result in permanent fund loss.
Minimum Withdrawal Amounts
Rule: Withdrawal amount must be greater than the fee
Why? Because you must receive something after fees. A withdrawal that results in zero or negative amount after fees is rejected.
Example:
✅ Valid:
Withdraw: 10 USDT
Fee: 5 USDT
You Receive: 5 USDT ✓ (positive amount)
❌ Invalid:
Withdraw: 5 USDT
Fee: 5 USDT
You Receive: 0 USDT ✗ (zero amount - not allowed)
❌ Invalid:
Withdraw: 3 USDT
Fee: 5 USDT
You Receive: -2 USDT ✗ (negative - not allowed)
Error Message You'll See:
"Amount must be greater than the platform fee of 5 USDT.
You will receive 0 USDT after fees."
Solution: Increase your withdrawal amount to be greater than the fee.
Fee Optimization Tips
1. Batch Your Withdrawals
- Instead of withdrawing 10 times with 100 USDT (10 × fee), withdraw once with 1,000 USDT (1 × fee)
- Saves you 9 fee payments
2. Use Lower-Fee Networks
- Research which networks your wallet supports
- Compare fees across networks for the same token
- Choose the most economical option
3. Withdraw Larger Amounts
- Fees are fixed, so as a percentage, they're smaller for larger withdrawals
- Example: 5 USDT fee on 100 USDT = 5% cost, but on 1,000 USDT = 0.5% cost
4. Check Current Network Congestion
- Some networks charge higher fees during peak usage
- Consider timing your withdrawal during off-peak hours (if platform adjusts fees dynamically)
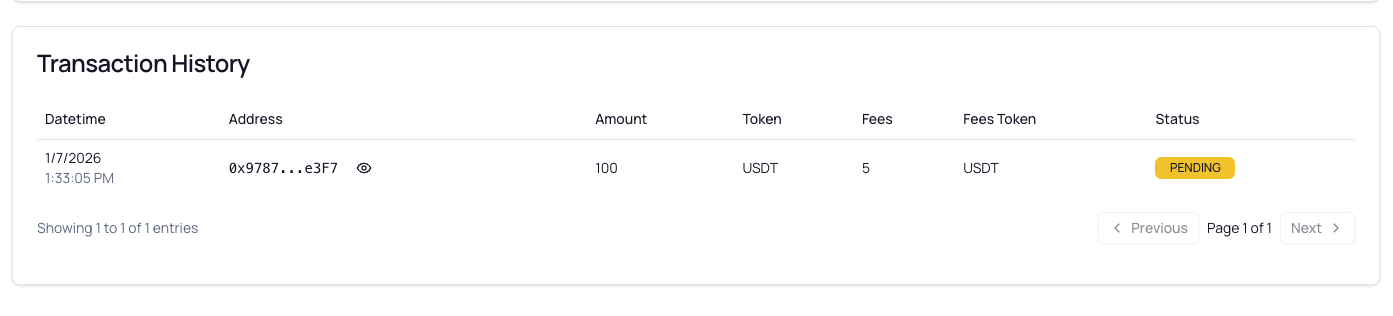
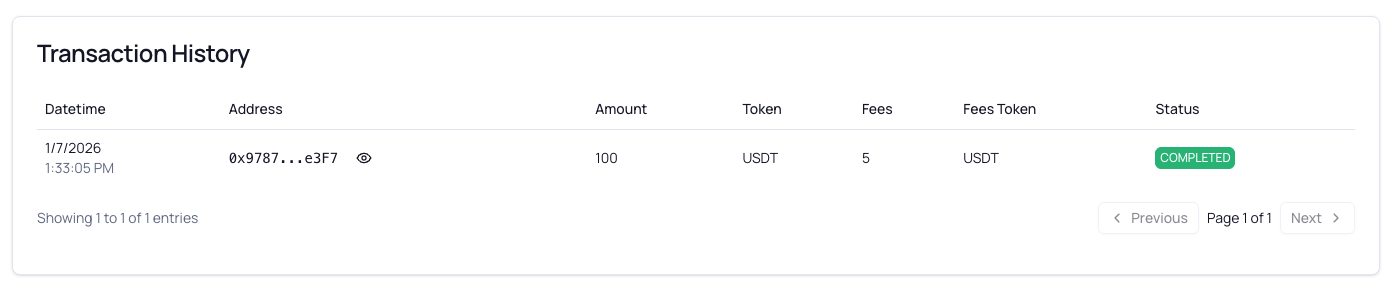
6. Transaction History
What is Transaction History?
The Transaction History section shows all your past and current withdrawal requests.
Location: At the bottom of the Payout page
What You Can See:
- Date and time of each withdrawal request
- Destination address
- Amount withdrawn
- Token type
- Fees charged
- Current status
Understanding the History Table
Columns Explained:
| Column | What It Shows | Example |
|---|---|---|
| Datetime | When you submitted the withdrawal | Dec 20, 20242:30:45 PM |
| Address | Where tokens were sent | 0x742d...f44e |
| Amount | Total deducted from your balance | 100.00 |
| Token | Which token was withdrawn | USDT |
| Fees | Platform fee charged | 5.00 |
| Fees Token | Token used for fee payment | USDT |
| Status | Current withdrawal status | Pending |
Address Display:
- Addresses are shortened by default:
0x742d...f44e - Click the eye icon 👁 to show the full address
- Click again to hide it
Pagination:
- Shows 10 transactions per page by default
- Use Previous/Next buttons to navigate
- See total entries at the bottom:
"Showing 1 to 10 of 25 entries"
Filtering and Searching
Current Features:
- Chronological order (newest first)
- All your withdrawals from all tokens
- All status types shown
Planned Features (if available):
- Filter by token type
- Filter by status
- Search by address
- Export to CSV
7. Withdrawal Status Explained
Each withdrawal goes through several status stages. Understanding these helps you track your withdrawal's progress.
Status Badges
Pending ⏳ (Yellow Badge)
- Meaning: Withdrawal request submitted and waiting for admin review
- What's Happening: Your request is in the queue
- Funds: Deducted from your available balance but not yet sent
- Action Required: None - wait for admin to process
- Typical Duration: 1-3 business days
Completed ✅ (Green Badge)
- Meaning: Withdrawal has been processed and sent to blockchain
- What's Happening: Tokens are on their way to your wallet (or already arrived)
- Funds: Sent to your external wallet address
- Action Required: Check your wallet for the incoming transaction
- Note: Blockchain confirmations may take additional time (minutes to hours)
Failed ❌ (Red Badge)
- Meaning: Withdrawal could not be completed
- What's Happening: Something went wrong during processing
- Funds: Returned to your available balance
- Action Required: Check for error details; you may need to try again or contact support
- Common Causes: Technical issues, compliance flags, invalid address
Canceled 🚫 (Gray Badge)
- Meaning: Withdrawal was cancelled (by you or admin)
- What's Happening: Request was stopped before processing
- Funds: Returned to your available balance
- Action Required: If you didn't cancel it, contact support to understand why
- Note: You can submit a new withdrawal request
Status Timeline Visualization
┌─────────────────────────────────────────────────────────────────┐
│                                                                 │
│  1. Request Submitted → 2. Pending → 3. Admin Review            │
│                                                                 │
│                                    ↓                            │
│                                                                 │
│                    ┌───── Failed (funds returned)               │
│                    │                                            │
│                    └───── Canceled (funds returned)             │
│                    │                                            │
│                    └───── Completed (tokens sent) ✓             │
│                                                                 │
└─────────────────────────────────────────────────────────────────┘
What To Do For Each Status
If Status is Pending:
- Wait patiently - this is normal
- Check back in 1-3 business days
- Ensure you have email notifications enabled (if available)
- Do not submit duplicate requests
If Status is Completed:
- Open your external wallet
- Check for the incoming transaction
- Look for the transaction in your wallet's history
- Note: Blockchain confirmations can take time:
- Ethereum: 5-15 minutes (or longer if congested)
- BSC: 1-5 minutes
- Polygon: 2-5 minutes
- If tokens haven't arrived after 24 hours, contact support with your transaction details
If Status is Failed:
- Check your transaction history for error details
- Verify your balance was refunded
- Review the destination address for issues
- Ensure the address is still valid and active
- Try submitting a new withdrawal request
- If it fails again, contact support
If Status is Canceled:
- Check if you cancelled during the 10-second window
- If you didn't cancel, contact support immediately
- Verify your balance was refunded
- Understand the cancellation reason before retrying
Common Questions About Status
Q: How long does "Pending" usually take?
A: Typically 1-3 business days, but can vary based on admin workload and compliance checks.
Q: Can I cancel a withdrawal that's "Pending"?
A: No. Once the 10-second cancellation window has passed, only admins can cancel withdrawals. Contact support if you need urgent cancellation.
Q: Why did my withdrawal fail?
A: Common reasons include: invalid or inactive address, compliance flags, technical issues, or insufficient platform liquidity. Check error details or contact support.
Q: My withdrawal is "Completed" but I don't see tokens in my wallet. What do I do?
A: Wait at least 1 hour for blockchain confirmations. If still missing after 24 hours, contact support with:
- Transaction ID (if provided)
- Withdrawal date and time
- Token and amount
- Destination address
Q: Can I speed up a "Pending" withdrawal?
A: No. Withdrawals are processed in the order received. Compliance and security checks cannot be skipped.
8. Troubleshooting
Common Issues and Solutions
Issue: "KYC Verification Required" Error
Symptoms:
- Can't select tokens
- Can't enter withdrawal amount
- "Withdraw" button shows "KYC Verification Required"
Solution:
- Go to Account > Identity Verification
- Complete your KYC if not submitted
- Wait for approval (1-3 business days typically)
- If rejected, review feedback and resubmit
- Once approved, return to Payout page
[!NOTE]
See the Step-by-Step: How to Complete KYC for detailed KYC instructions.
Issue: "Two-Factor Authentication Required" Error
Symptoms:
- Can't make withdrawals
- Modal appears saying "Two-Factor Authentication Required"
Solution:
- Go to Account > Security
- Enable Two-Factor Authentication (TOTP)
- Install an authenticator app if you don't have one
- Scan the QR code and verify with 6-digit code
- Return to Payout page
[!NOTE]
See the 3. Two-Factor Authentication (2FA) for step-by-step 2FA setup instructions.
Issue: "No compatible addresses for this token" Error
Symptoms:
- Selected a token
- Address dropdown shows "No compatible addresses"
Cause: Your saved addresses don't support the blockchain networks configured for this token.
Solution:
- Click "New Address" in the dropdown (or go to Account > Address Book)
- Add a new address on a compatible network
- For example, if withdrawing USDT:
- Add an Ethereum address, OR
- Add a BSC address, OR
- Add a Polygon address
- (Whichever network your wallet supports and the token is configured for)
- Verify the address with screenshot and 2FA
- Return to Payout page and select your new address
[!NOTE]
See the 4. Address Book Management for detailed Address Book instructions.
Issue: "Amount must be greater than the platform fee" Error
Symptoms:
- Entered withdrawal amount
- Error message about fee appears
Cause: Your withdrawal amount doesn't exceed the platform fee, resulting in zero or negative amount after fee deduction.
Solution:
- Check the current withdrawal fee (shown in confirmation modal or history)
- Increase your withdrawal amount to be greater than the fee
- Example: If fee is 5 USDT, withdraw at least 5.000001 USDT or more
Alternative Solution:
- If you don't have enough to cover the fee, wait until you receive more tokens or accumulate more balance
Issue: "Amount exceeds available balance" Error
Symptoms:
- Entered withdrawal amount
- Error says it exceeds your balance
Cause: You're trying to withdraw more than you have.
Solution:
- Check your available balance (shown below the amount field)
- Click the "Max" button to auto-fill your entire available balance
- Or manually enter a lower amount
If "Max" Still Causes Error:
- There may be rounding issues with decimals
- Manually reduce the amount slightly (e.g., if balance is 100.123456, try 100.12)
- Contact support if the issue persists
Issue: "Invalid TOTP code" Error
Symptoms:
- Entered 6-digit 2FA code
- Error says "Invalid or expired code"
Common Causes & Solutions:
1. Code Expired While Typing
- Solution: Wait for the next code (30 seconds) and try again
2. Wrong Code Entered
- Solution: Double-check you're reading the correct digits from your authenticator app
3. Looking at Wrong Account
- Solution: Make sure you're looking at "TradePoint" in your authenticator app, not another service
4. Phone Time is Incorrect
- Solution:
- Go to your phone's Settings
- Find Date & Time settings
- Enable "Set Automatically" or "Use Network Time"
- Close and reopen your authenticator app
- Try again
5. 2FA Configuration Corrupted
- Solution: Contact support to reset your 2FA (requires identity verification)
Issue: Withdrawal is Stuck in "Pending" for Too Long
Symptoms:
- Withdrawal has been "Pending" for more than 3 business days
- No status update
Solution:
- Check if it's a weekend or holiday - Admin processing may be delayed
- Wait at least 3 full business days before escalating
- Contact support if still pending after 3 business days with:
- Your transaction ID (from history table)
- Date and time of withdrawal request
- Token and amount
- Any error messages you've seen
Issue: Withdrawal is "Completed" but Tokens Not in Wallet
Symptoms:
- Status shows "Completed"
- Tokens haven't arrived in your external wallet
Solutions:
1. Wait for Blockchain Confirmations
- Ethereum: Can take 5-60 minutes (or longer if network congested)
- BSC: Usually 1-5 minutes
- Polygon: Usually 2-5 minutes
- Action: Wait at least 1 hour before investigating
2. Check Correct Wallet & Network
- Are you looking at the correct wallet?
- Are you viewing the correct network in your wallet?
- Example: If you sent USDT on BSC, make sure your wallet is viewing the BSC network, not Ethereum
- Action: Switch networks in your wallet and check again
3. Check Transaction on Blockchain Explorer
- If provided, use the transaction hash to look up the transaction
- Ethereum: etherscan.io
- BSC: bscscan.com
- Polygon: polygonscan.com
- Action: Verify the transaction was actually sent on-chain
4. Contact Support (After 24 Hours)
- If still missing after 24 hours, contact support with:
- Transaction ID from your history
- Destination address
- Network used
- Token and amount
- Screenshots of your wallet showing the address
Issue: Can't See Full Transaction Address
Symptoms:
- Address in history is shortened (e.g.,
0x742d...f44e) - Need to verify full address
Solution:
- Look for the eye icon 👁 next to the address in the history table
- Click it to toggle between shortened and full address
- Click again to hide the full address
Alternative:
- Copy the shortened address and paste into a text editor - it may auto-expand
- Check your Address Book for the full address if you remember the label
9. Security Best Practices
Protect Your Withdrawals
Cryptocurrency withdrawals are irreversible. Once sent, funds cannot be recovered. Follow these best practices to protect yourself.
Before Every Withdrawal
✅ DO:
- Triple-check the destination address
- Verify it character by character
- Cryptocurrency addresses are case-sensitive
- One wrong character = permanent fund loss
- Verify the network matches your wallet
- Ethereum address ≠ BSC address (even if same format)
- Check your wallet's network setting
- Ask yourself: "Does my wallet support this network?"
- Test with a small amount first
- For new addresses, send a small test amount first
- Confirm receipt before sending larger amounts
- Small fee now saves potential large loss later
- Save and label addresses carefully
- Use clear, descriptive labels (e.g., "Ledger ETH Main" not "Wallet 1")
- Keep address book organized
- Remove old/unused addresses to avoid confusion
- Review the transaction summary
- Amount you'll receive (after fees)
- Destination address (full, not truncated)
- Network name
- Timestamp
- Keep your 2FA device secure
- Don't share your phone or authenticator app
- Save backup codes in a safe place (not on your phone)
- Enable biometric lock on your phone
❌ DON'T:
- Don't rush withdrawals
- Take your time to verify everything
- One minute of checking > hours of regret
- Don't copy-paste blindly
- Malware can replace clipboard contents
- Always visually verify the pasted address
- Don't ignore network warnings
- If system says "incompatible address," believe it
- Don't try to force a withdrawal to an incompatible network
- Don't share your 2FA codes
- TradePoint staff will NEVER ask for your 2FA code
- Anyone asking for your code is a scammer
- Don't save addresses in haste
- Take time to verify before adding to address book
- Wrong address in address book = repeated mistakes
- Don't disable 2FA
- Keep 2FA enabled at all times
- Temporarily disabling "for convenience" creates security risk
Recognize Withdrawal Scams
TradePoint Will NEVER:
- ❌ Ask for your 2FA codes via email, chat, or phone
- ❌ Ask for your password
- ❌ Request you to disable 2FA
- ❌ Tell you to withdraw to a "verification address"
- ❌ Demand urgent withdrawals or "limited time" actions
- ❌ Threaten account closure unless you withdraw funds
Common Scam Tactics:
1. Phishing Emails
- Fake emails claiming to be from TradePoint
- Links to fake login pages that steal credentials
- Protection: Always go directly to the official TradePoint website
2. Fake Support
- Scammers impersonating support staff
- Asking for 2FA codes to "verify" your account
- Protection: Official support NEVER asks for 2FA codes
3. Address Replacement Malware
- Malware on your device that changes copied addresses
- You copy a good address, but malware replaces it with scammer's address
- Protection: Use antivirus software, verify addresses character-by-character
4. Social Engineering
- Scammer pretends to be admin/support needing "urgent action"
- Claims your account is compromised and you must withdraw immediately
- Protection: Ignore urgency; contact support through official channels
Additional Security Tips
1. Use Strong Authentication
- Enable 2FA/TOTP (mandatory for withdrawals)
- Use a strong, unique password for your account
- Don't reuse passwords across multiple sites
- Consider using a password manager
2. Keep Software Updated
- Update your authenticator app regularly
- Keep your wallet software up to date
- Update your operating system and browser
- Use official app stores only
3. Use Hardware Wallets for Large Amounts
- For significant holdings, consider hardware wallets (Ledger, Trezor)
- Hardware wallets provide physical security
- Even if your computer is compromised, funds remain safe
4. Monitor Your Account
- Regularly check your transaction history
- Report any unauthorized activity immediately
- Set up email/SMS notifications if available
5. Secure Your Email Account
- Your email is the gateway to password resets
- Enable 2FA on your email account
- Use a strong, unique password
- Monitor for unauthorized access
6. Be Cautious with Public Wi-Fi
- Avoid making withdrawals on public Wi-Fi
- Use a VPN if you must access on public networks
- Consider using mobile data instead
7. Document Everything
- Screenshot your withdrawal confirmations
- Save transaction IDs
- Keep records of addresses you've used
- This helps if you need support assistance
What To Do If Something Goes Wrong
If You Suspect Unauthorized Access:
- Change your password immediately
- Check your 2FA is still enabled and working
- Review recent transaction history for unauthorized withdrawals
- Contact support immediately
- Document everything (times, amounts, addresses)
If You Sent to Wrong Address:
- Contact support immediately with:
- Transaction ID
- Correct vs incorrect address
- Network used
- Amount and token
- Understand recovery may not be possible
- Blockchain transactions are irreversible
- Support will assess if anything can be done
- Do not expect automatic refund
If You Encounter a Scam Attempt:
- Do not provide any information
- Do not click any links
- Report to support immediately
- Share details (email address, phone number, message content)
- Warn others if you're in a community forum
Need More Help?
If you're still having trouble after reading this guide:
- Check the FAQ section in the main platform
- Review the TradePoint User Account Settings Guide for KYC, 2FA, and Address Book issues
- Contact your system administrator - they can help with most issues
- Reach out to the support team - contact information should be provided by your administrator
When Contacting Support, Always Provide:
- What you were trying to do
- What step you're stuck on
- Any error messages you see (exact wording)
- Screenshots (blur sensitive information like addresses or balances)
- Your transaction ID (if applicable)
- Date and time of the issue
Summary Checklist
Before making your first withdrawal, ensure you have:
- Completed KYC verification and received approval
- Enabled Two-Factor Authentication (TOTP) with an authenticator app
- Added at least one withdrawal address to your Address Book
- Verified the address with proof screenshot and 2FA
- Understood withdrawal fees for your chosen token and network
- Read this entire guide and understand the withdrawal process
- Know how to use your authenticator app to get 2FA codes
- Tested with a small amount (recommended for new addresses)
Once Ready:
- Go to Payout
- Select token
- Select address
- Enter amount
- Review carefully
- Confirm with 2FA
- Monitor status in transaction history
This guide is maintained by the TradePoint team. Last updated: January 2025