Token Refund Guide
A comprehensive guide to requesting token refunds, understanding the review process, and tracking your refund requests on TradePoint.
1. Introduction
The Token Refund feature allows eligible users to request a return of their unvested token allocations. This is a manual review process that requires admin approval before any funds are returned.
What You Can Do
- Request Refunds - Submit requests to return your unvested token allocations
- Track Status - Monitor the review and approval process
- View History - See all your past and current refund requests
- Receive Updates - Get notified when your request is approved or rejected
[!IMPORTANT] Token refunds are not automatic. Every request requires manual review and approval by the platform’s operations team. Processing times vary based on compliance requirements and administrative workload.
2. What is a Token Refund?
Definition
A token refund is the process of returning your token allocation back to the platform before it has fully vested. This allows you to exit your token position early rather than waiting for the full vesting schedule to complete.
When to Request a Refund
Common reasons for requesting a refund:
Portfolio Rebalancing
- You want to exit your position in a specific token
- Market conditions have changed your investment strategy
- You need liquidity for other opportunities
Personal Circumstances
- Financial needs require liquidating your position
- You’re no longer comfortable holding the token
- Compliance or regulatory requirements
Project Changes
- Token project direction has changed
- You disagree with project developments
- Loss of confidence in the token’s future
[!NOTE] Refunds are a privilege, not a guaranteed right. The platform reserves the right to approve or reject refund requests based on terms of service, compliance requirements, and operational capacity.
What Gets Refunded?
When you request a refund, you’re requesting to return:
1. Unvested Tokens (Future Releases)
- Tokens that haven’t vested yet according to your schedule
- All remaining tokens in your vesting pipeline
- This is typically the largest portion
2. Unclaimed Tokens (Vested but Not Claimed)
- Tokens that have vested but you haven’t claimed yet
- These are in your “Available to Claim” balance
- These tokens are also returned to the platform
Formula:
Refundable Amount = Remaining Unvested Tokens + Unclaimed Tokens
Example:
Total Allocation: 100,000 tokens
Already Claimed: 20,000 tokens
Vested but Unclaimed: 5,000 tokens
Still Unvested: 75,000 tokens

Refundable Amount = 75,000 + 5,000 = 80,000 tokens
[!CAUTION] Tokens you’ve already claimed and withdrawn are NOT refundable. Once tokens are in your external wallet, they cannot be returned through the refund process.
What Happens After a Refund is Approved?
Your Vesting Stops:
- No more tokens will vest daily
- Your vesting schedule is set to 0
- You cannot claim any more tokens
Your Unclaimed Balance is Cleared:
- Any tokens in “Available to Claim” are removed
- These tokens return to the platform
Your Allocation is Closed:
- The vesting schedule is marked as “refund” status
- No further action is possible on that allocation
You Receive Your Refund:
- The admin team processes the refund manually
- Refund is sent to your designated destination (wallet address)
- You receive confirmation via email
3. Prerequisites
Before you can request a token refund, you must meet these requirements:
Requirement 1: Refund Feature Enabled
Why Required: Not all users have access to the refund feature. This is controlled by platform configuration.
How to Check:
- Go to your Portfolio page
- Look for the “Refund Tokens” button
- If you see the button, the feature is enabled
- If you don’t see it, refunds are not available for your account
If Not Available:
- Contact your account manager or admin team
- Explain your reason for needing a refund
- They can enable the feature if appropriate
[!NOTE] Refund availability is determined by your account type, user configuration, and platform policies. It is not enabled by default for all users.
Requirement 2: KYC Verification (Identity Verification)
Why Required: Refunds involve moving funds, which requires identity verification for compliance and anti-money laundering regulations.
Status: Your KYC must be Approved
How to Check:
- Go to Account Settings > Identity Verification
- Look for your KYC status
- If it says “Approved” ✅, you’re ready
- If not approved, you must complete KYC first
When Requesting Refund:
- If KYC is not approved, you’ll see an error message
- The refund dialog will show a “Complete KYC Verification” button
- Complete KYC before attempting to request a refund
[!NOTE] See the Step-by-Step: How to Complete KYC for detailed KYC instructions.
Requirement 3: Two-Factor Authentication (2FA/TOTP)
Why Required: Refund requests require 2FA confirmation to prevent unauthorized requests.
Status: TOTP must be Enabled and Active
How to Check:
- Go to Account Settings > Security
- Look for “Two-Factor Authentication” section
- If it says “Active” ✅, you’re ready
- If inactive, you must set up 2FA
For Refund Requests:
- You’ll need your authenticator app ready
- 6-digit code required to submit the refund request
- Code must be current and valid
[!IMPORTANT] Without 2FA, you cannot submit refund requests. This security measure protects your funds from unauthorized access.
[!NOTE] See the 3. Two-Factor Authentication (2FA) for 2FA setup instructions.
Requirement 4: Saved Wallet Address
Why Required: Refunds can be sent to your saved wallet addresses in the Address Book.
How to Add:
- Go to Account Settings > Manage Address Book
- Provide wallet address, network, label, and verification screenshot
- Verify with 2FA code
- Address is saved for future use
For Refund Requests:
- You’ll select from your saved addresses during the refund process
- Only addresses compatible with the token’s network will be shown
- If you have no addresses, you’ll be prompted to add one
[!TIP] Add your refund destination address in advance to streamline the refund request process.
[!NOTE] See the 4. Address Book Management for Address Book instructions.
Summary of Prerequisites
| Requirement | What You Need | Where to Check |
|---|---|---|
| ✅ Refund Enabled | Feature must be activated for your account | Portfolio page - “Refund Tokens” button visible |
| ✅ KYC Approved | Identity verification completed and approved | Account > Identity Verification |
| ✅ 2FA Enabled | Authenticator app set up and active | Account > Security |
| ✅ Saved Address | At least one verified wallet address | Account > Address Book |
When All Requirements Met:
- The “Refund Tokens” button will be clickable
- You can select tokens for refund
- You can complete the refund request process
If Requirements Not Met:
- The refund request will show error messages
- You’ll see prompts to complete missing requirements
- Links will guide you to the appropriate settings pages
4. Understanding Refundable Amounts
What Can Be Refunded?
Your refundable amount includes two components:
1. Vesting Remaining (Unvested Tokens)
- Tokens that have not yet vested according to your schedule
- These are future tokens you’re entitled to receive
- Calculated as:
Total Allocation - Vested So Far
2. Unclaimed Balance
- Tokens that have vested but you haven’t claimed yet
- These are in your “Available to Claim” balance
- Found in the vesting schedule’s blue card
Total Refundable Amount:
Refundable = Vesting Remaining + Unclaimed
Example Calculation
Let’s say you have this vesting situation:
┌─────────────────────────────────────────┐
│  Your Vesting Schedule:                 │
│                                         │
│  Total Allocation:    100,000 tokens    │
│  Vested So Far:        32,500 tokens    │
│  Available to Claim:    5,000 tokens    │
│  Already Claimed:      27,500 tokens    │
└─────────────────────────────────────────┘
Calculation:
Vesting Remaining = 100,000 - 32,500 = 67,500 tokens
Unclaimed Balance = 5,000 tokens

Total Refundable = 67,500 + 5,000 = 72,500 tokens
What Happens to Each Category:
| Category | Amount | After Refund |
|---|---|---|
| Already Claimed | 27,500 | ✅ You keep these (in your wallet) |
| Unclaimed | 5,000 | ❌ Returned to platform |
| Unvested | 67,500 | ❌ Returned to platform |
| You Keep | 27,500 | 27.5% of original allocation |
| Refunded | 72,500 | 72.5% of original allocation |
Multiple Funding Rounds
If you have allocations across multiple funding rounds (e.g., Seed Round + Series A), the refund includes:
- ✅ All unvested tokens from all rounds
- ✅ All unclaimed tokens from all rounds
- ✅ Entire allocation for the selected token
You cannot request partial refunds:
- Can’t refund only one round and keep another
- Can’t refund a percentage (e.g., 50% of allocation)
- It’s all-or-nothing per token
Example with Multiple Rounds:
Token: USDT

Round 1 (Seed):
  Total: 50,000 | Vested: 15,000 | Unclaimed: 2,000 | Claimed: 13,000
  Refundable = (50,000 - 15,000) + 2,000 = 37,000

Round 2 (Series A):
  Total: 30,000 | Vested: 10,000 | Unclaimed: 1,500 | Claimed: 8,500
  Refundable = (30,000 - 10,000) + 1,500 = 21,500

Total USDT Refundable = 37,000 + 21,500 = 58,500 tokens
Where to See Refundable Amount
In the Refund Dialog:
- Click “Refund Tokens” button on Portfolio page
- Select your token
- The dialog shows:
Refund Amount Details: Total Amount: 72,500.000000 USDT Total Estimated USD: $72,500.00
This is the amount you’re requesting to refund.
[!NOTE] The USD value is estimated based on the token price at allocation time. Actual refund value may differ based on current market rates and admin discretion.
5. Requesting a Refund
Follow these steps to submit a token refund request.
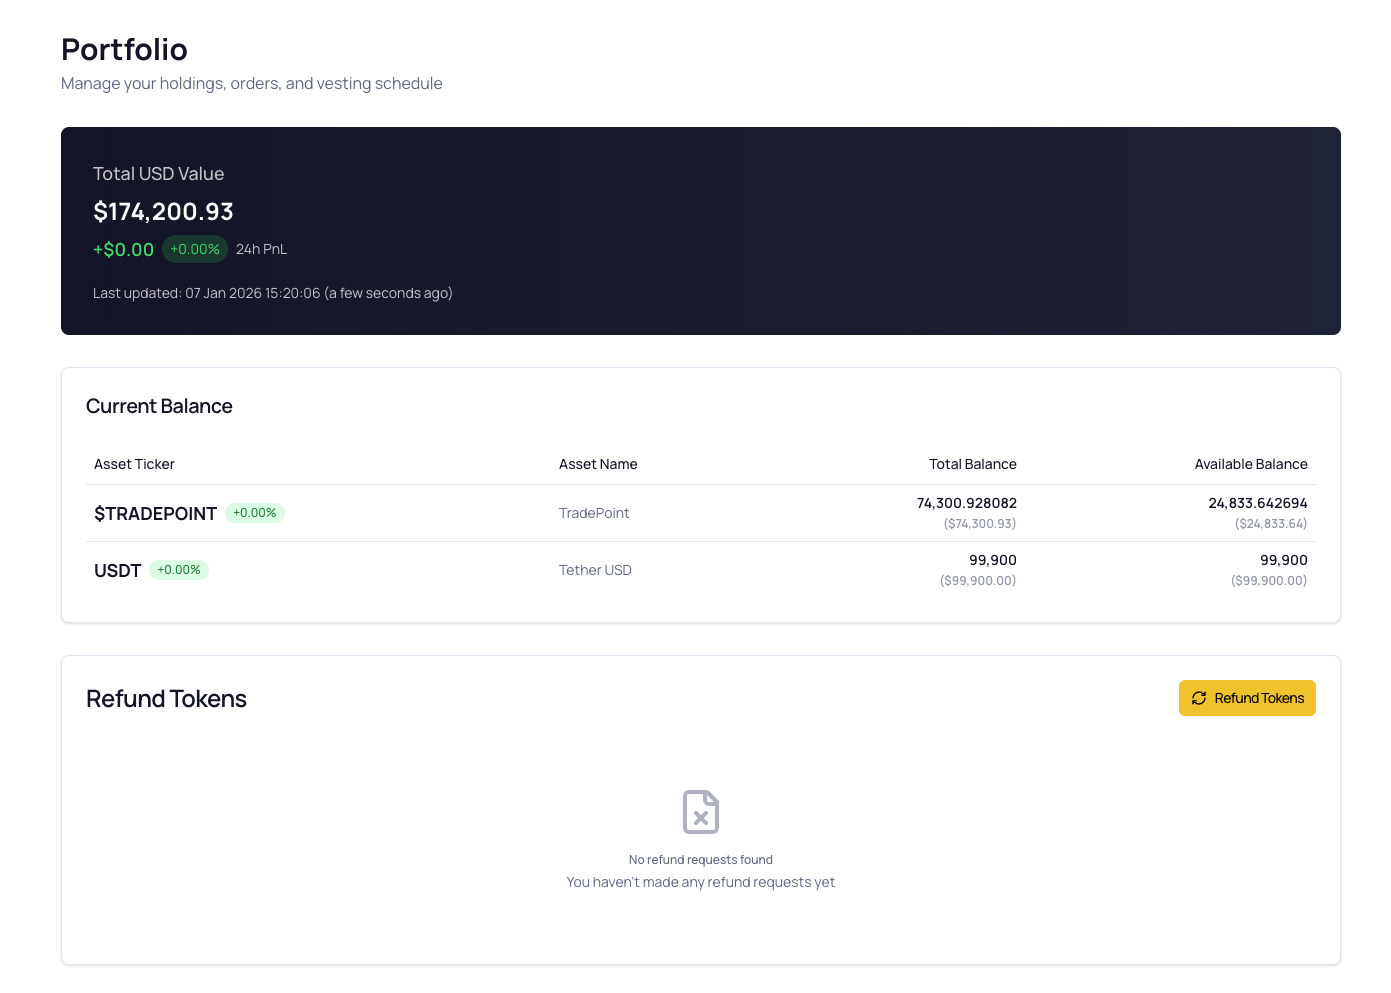
Step 1: Navigate to Portfolio
- Log into your TradePoint account
- Click “Portfolio” from the main menu
- Scroll to the “Token Vesting Schedule” or “Refund Tokens” section
- Click the “Refund Tokens” button

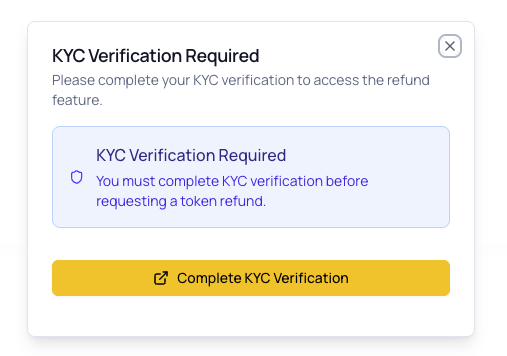
Step 2: KYC Check (Automatic)
When you click “Refund Tokens,” the system automatically checks your KYC status.
If KYC is Approved ✅:
- The dialog proceeds to token selection
- You won’t see any KYC messages
If KYC is Not Approved ❌:
- You’ll see a message: “KYC Verification Required”
- A button appears: “Complete KYC Verification”
- Click the button to open KYC page in a new tab
- Complete KYC and return to try again
Example Message:
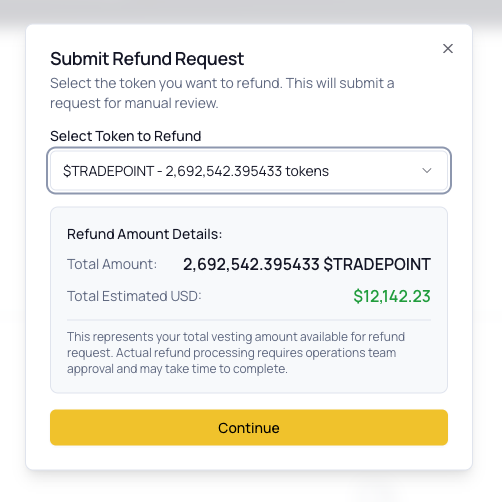
Step 3: Select Token to Refund
After passing KYC check, you’ll see the token selection screen.
What You’ll See:
- Existing Refund Requests (if any):
- Yellow warning box listing tokens with active refunds
- Shows token symbol, amount, and status
- These tokens cannot be selected again
- Token Dropdown:
- Lists all tokens with active vesting schedules
- Shows token symbol and refundable amount
- Excludes tokens with pending or confirmed refunds
- Refund Amount Details Card:
- Appears after selecting a token
- Shows total refundable amount
- Shows estimated USD value
Example Display:
If No Tokens Available:
- Message: “No Vesting Schedules Found”
- Either you have no vesting schedules, or all have active refund requests
If All Tokens Have Active Refunds:
- Dropdown shows: “All tokens have pending or confirmed refund requests”
- You must wait for existing requests to be processed
Step 4: Continue to Destination Selection
- Review the refund amount details
- Ensure you understand what’s being refunded
- Click the “Continue” button
What Happens:
- System validates your selection
- Checks for any errors
- Moves to destination selection screen
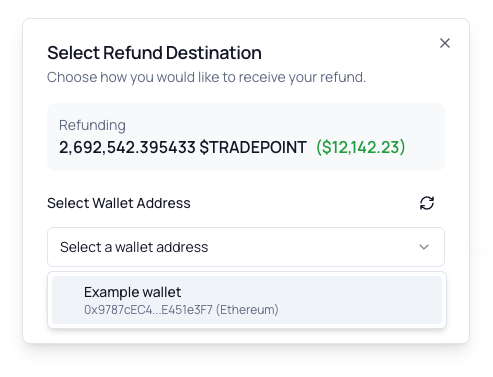
Step 5: Select Refund Destination
Choose where you want to receive your refund.
Current Option: Wallet Address
What You’ll See:
- Token Summary:
- Shows the token you’re refunding
- Displays amount and USD value
- Select Wallet Address Dropdown:
- Lists your saved addresses from Address Book
- Shows: Label, shortened address, network name
- Only shows addresses compatible with the token
- Refresh Button:
- Reloads your address book
- Use if you just added a new address
Example:
If No Addresses Available:
- Yellow warning appears: “No wallet addresses found”
- Link to Address Book to add one
- You must add an address before continuing
Selecting an Address:
- Click the dropdown
- Review your saved addresses
- Click on the address you want to use
- The selection is saved
[!IMPORTANT] Double-check the selected address carefully. Refunds sent to the wrong address may be permanently lost. Ensure the address supports the token and network.
Step 6: Continue to 2FA Confirmation
- Verify your destination selection is correct
- Click the “Continue” button
What Happens:
- System validates your destination selection
- Moves to 2FA confirmation screen
Step 7: Review and Enter 2FA Code
This is the final confirmation screen before submitting your refund request.
What You’ll See:
1. Refund Request Summary Card:
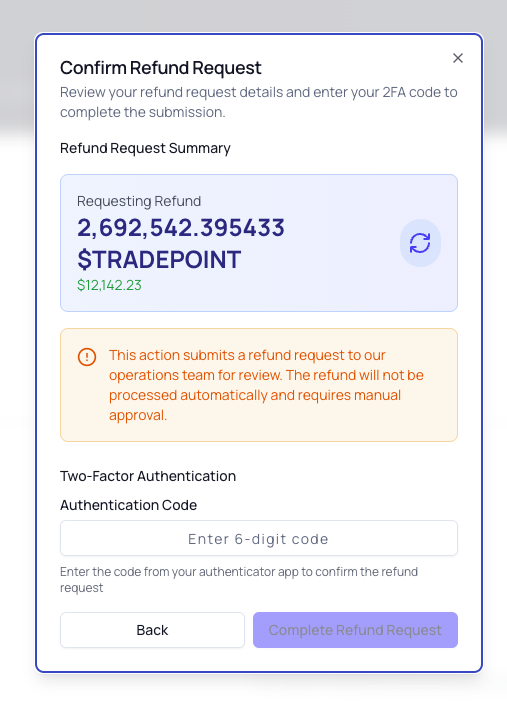
2. Two-Factor Authentication Section:
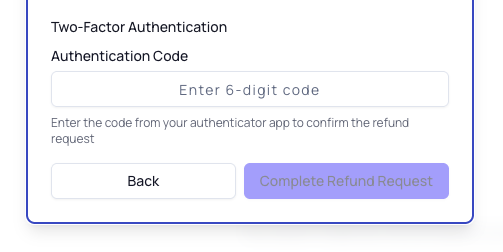
Entering Your 2FA Code:
- Open your authenticator app (Google Authenticator, Authy, etc.)
- Find the TradePoint entry
- You’ll see a 6-digit code (e.g.,
123 456) - Type the code into the “Authentication Code” field
- The field only accepts numbers and limits to 6 digits
Code Requirements:
- Must be exactly 6 digits
- Must be current (changes every 30 seconds)
- Must be entered before expiration
[!TIP] If the code is about to expire (timer almost at zero), wait for the next code to avoid having to re-enter it.
Step 8: Submit Refund Request
- Ensure your 6-digit code is correct
- Review the summary one last time
- Click “Complete Refund Request” button
During Processing:
- Button shows “Processing…”
- Dialog remains open
- Do not close the browser or navigate away
On Success:
- Success message appears
- Shows ticket ID for your refund request
- Dialog closes automatically
Example Success:
What Happens Next:
- Your refund request enters the admin review queue
- Status is set to “Pending”
- Your vesting continues normally until approval
- You can track status in your Refund History
[!IMPORTANT] Keep your Ticket ID for reference. You’ll need it when communicating with support about your refund request.
Step 9: After Submission
Immediate Changes:
- New refund request appears in your Refund History table
- Status shows as “Pending”
- You receive a confirmation message
You Can:
- ✅ Continue using the platform normally
- ✅ Claim vested tokens (until refund is approved)
- ✅ View your refund history
- ✅ Monitor the status
You Cannot:
- ❌ Submit another refund for the same token (duplicate prevention)
- ❌ Cancel the refund yourself (contact admin if needed)
- ❌ Modify the refund amount or destination
[!NOTE] While your refund is pending, your vesting schedule continues as normal. Tokens will continue to vest daily until the admin approves the refund.
6. Refund Review Process
How Refund Reviews Work
All refund requests go through a manual review process by the platform’s operations and compliance teams.
Review Timeline
┌────────────────────────────────────────────────────────────────┐
│                                                                │
│  Submitted       Under Review      Decision       Processed    │
│  (Day 0)         (Days 1-5)        (Day 3-7)      (Day 7-14)   │
│  │               │                 │              │            │
│  ▼               ▼                 ▼              ▼            │
│  Pending ────→ Reviewing ────→ Approved ────→ Confirmed        │
│                               │                                │
│                               └────→ Rejected                  │
│                                                                │
└────────────────────────────────────────────────────────────────┘
Typical Processing Times:
- Submission to Review Start: 1-2 business days
- Review Duration: 3-5 business days
- Approval to Fund Transfer: 2-7 business days
- Total Duration: 1-2 weeks (can vary)
[!NOTE] Processing times are estimates and can vary based on:
- Admin team workload
- Compliance requirements
- Size of the refund request
- Verification needs
- Weekends and holidays
What Admins Review
Compliance Checks:
- ✅ KYC verification status
- ✅ Account standing and history
- ✅ Terms of service compliance
- ✅ Anti-money laundering (AML) checks
Technical Validation:
- ✅ Refund amount calculation accuracy
- ✅ Destination address validity
- ✅ Vesting schedule status
- ✅ No duplicate or fraudulent requests
Business Considerations:
- ✅ Platform liquidity and capacity
- ✅ Refund policy alignment
- ✅ User’s refund history
- ✅ Special circumstances or notes
Possible Outcomes
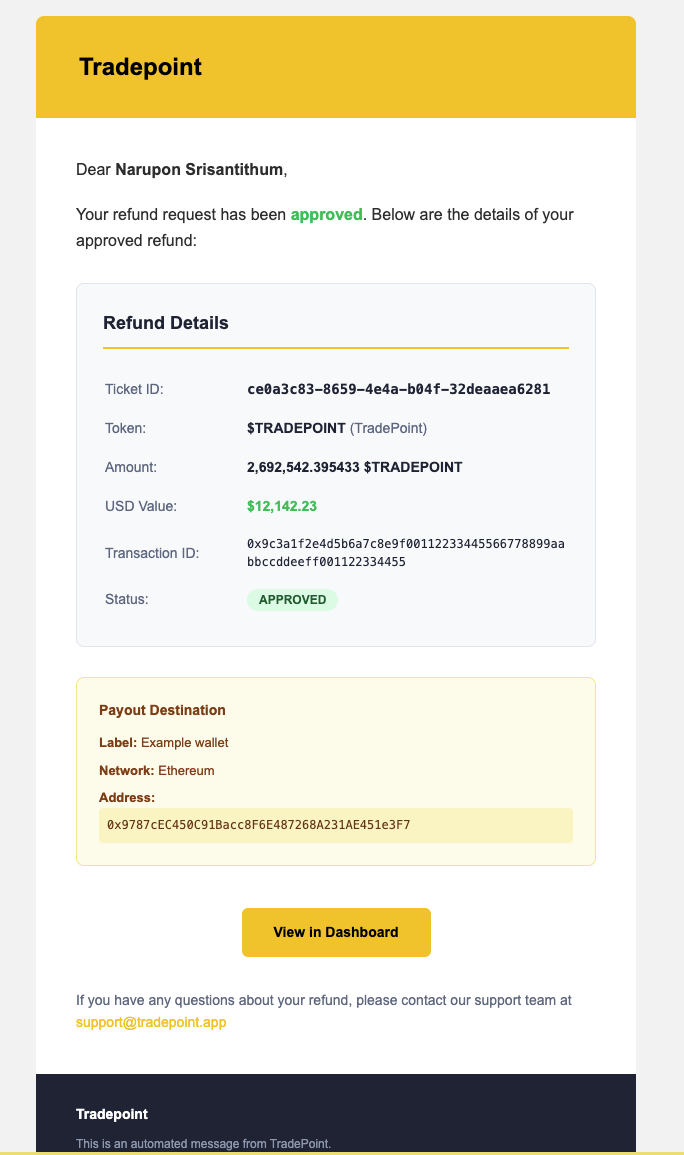
1. Approved ✅
- Admin accepts your refund request
- Transaction ID is assigned
- Vesting is stopped and zeroed
- Unclaimed balance is cleared
- Refund is processed to your destination
- Status changes to “Confirmed”
- You receive approval notification email
2. Rejected ❌
- Admin declines your refund request
- Reason is provided in “Additional Note”
- Your vesting continues normally
- No changes to your allocation
- Status changes to “Rejected”
- You receive rejection notification email
3. Expired ⏰ (if applicable)
- Request has expired based on platform policy
- Some platforms set expiration periods for refund requests
- You may need to resubmit if you still want a refund
- Status changes to “Expired”
Communication During Review
You Will Be Notified:
- ✅ When your request is submitted (immediate confirmation)
- ✅ When your request is approved (email notification)
- ✅ When your request is rejected (email notification with reason)
- ✅ When refund is processed and sent (email with transaction details)
You Should:
- Check your email regularly for updates
- Monitor your Refund History in the platform
- Be patient during the review period
- Contact support only if there’s unusual delay
Admin May Contact You:
- For additional verification
- To clarify destination details
- To discuss compliance concerns
- To explain approval or rejection reasons
During the Pending Period
What Happens to Your Tokens:
- ✅ Vesting continues as normal
- ✅ You can still claim vested tokens
- ✅ Daily vesting rate remains active
- ✅ New tokens unlock each day
What You Can Do:
- ✅ Use the platform normally
- ✅ Claim tokens (though they’ll be deducted if refund approved)
- ✅ View your refund status
- ✅ Check refund history
What You Cannot Do:
- ❌ Submit duplicate refund requests for same token
- ❌ Cancel the request yourself
- ❌ Modify refund details
[!IMPORTANT] If you claim tokens after submitting a refund request and before approval:
These claimed tokens will be accounted for when the refund is processed. The admin team will recalculate the refundable amount at the time of approval, excluding tokens you’ve claimed since submission.
7. Refund Status Explained
Each refund request progresses through different status stages. Understanding these helps you track your request.
Status Badges
Pending ⏳ (Yellow Badge)
- Meaning: Refund request submitted and awaiting admin review
- What’s Happening: Your request is in the review queue
- Funds: Your vesting continues normally
- Action Required: None - wait for admin team to review
- Typical Duration: 1-2 weeks
Confirmed ✅ (Green Badge)
- Meaning: Refund has been approved and processed
- What’s Happening: Funds have been sent to your destination
- Funds: Refund completed, vesting stopped, unclaimed balance cleared
- Action Required: Check your destination wallet for the incoming transaction
- Note: This is the final successful state
Rejected ❌ (Red Badge)
- Meaning: Refund request was declined by admin team
- What’s Happening: Request is closed, no refund will be processed
- Funds: Your vesting continues normally
- Action Required: Read the rejection reason in “Additional Note”
- Note: You may resubmit with corrections if appropriate
Expired ⏰ (Gray Badge) (if applicable)
- Meaning: Refund request exceeded the expiration period
- What’s Happening: Request is automatically closed due to time limit
- Funds: Your vesting continues normally
- Action Required: Submit a new refund request if still needed
- Note: Not all platforms use expiration periods
Closed 🔒 (Blue Badge) (rare)
- Meaning: Refund request was manually closed by admin
- What’s Happening: Request is no longer active
- Funds: Depends on reason for closure
- Action Required: Contact admin team for explanation
- Note: This is used for administrative purposes
Status Timeline Visualization
┌─────────────────────────────────────────────────────────────────┐
│                                                                 │
│  1. Submit Request → 2. Pending → 3. Admin Review               │
│                                                                 │
│                                    ↓                            │
│                                                                 │
│                    ┌───── Rejected (vesting continues)          │
│                    │                                            │
│                    └───── Expired (time limit reached)          │
│                    │                                            │
│                    └───── Confirmed (refund processed) ✓        │
│                                                                 │
└─────────────────────────────────────────────────────────────────┘
What To Do For Each Status
If Status is Pending:
- Wait patiently - reviews take time
- Check back every few days
- Ensure you have email notifications enabled
- Do not submit duplicate requests
- Contact support only if delayed beyond 2 weeks
If Status is Confirmed:
- Check your destination wallet
- Look for the incoming transaction
- Verify the amount matches your refund request
- Note that blockchain confirmations may take time:
- Ethereum: 5-15 minutes
- BSC: 1-5 minutes
- Polygon: 2-5 minutes
- If funds haven’t arrived after 24 hours, contact support with:
- Your ticket ID
- Transaction ID (if provided)
- Destination address
If Status is Rejected:
- Read the “Additional Note” for the rejection reason
- Understand why the request was declined
- Determine if you can address the issue
- If reason is unclear, contact admin team
- You may resubmit if you’ve resolved the issue
- Your vesting continues normally
If Status is Expired:
- Determine if you still want a refund
- Submit a new refund request if yes
- Ensure you meet all current requirements
- Your vesting continues normally
Common Questions About Status
Q: How long does “Pending” usually take? A: Typically 1-2 weeks, but can vary based on admin workload, compliance requirements, and request complexity.
Q: Can I cancel a refund that’s “Pending”? A: Not directly. Contact the admin team or support if you need to cancel. Explain your reason and they may be able to close the request.
Q: Why was my refund rejected? A: Common reasons include:
- Compliance or KYC issues
- Terms of service violations
- Platform liquidity constraints
- Invalid or problematic destination address
- Account standing concerns Check the “Additional Note” for specific details.
Q: My refund is “Confirmed” but I don’t see funds in my wallet. What do I do? A: Wait at least 1 hour for blockchain confirmations. If still missing after 24 hours, contact support with:
- Transaction ID (from refund details)
- Ticket ID
- Destination address
- Screenshots showing empty wallet
Q: Can I speed up a “Pending” refund? A: No. Refunds must go through the review process. Compliance and security checks cannot be skipped. Contacting support frequently will not expedite the process.
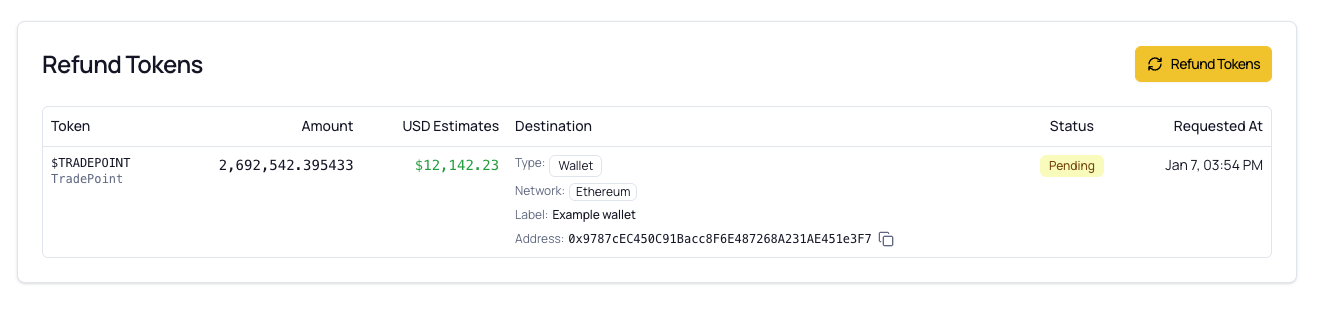
8. Tracking Your Refund History
Accessing Refund History
Location: At the bottom of the Portfolio page, in the “Refund History” section
What You Can See:
- All your past and current refund requests
- Date and time of each request
- Token being refunded
- Refund amount
- Destination details
- Current status
- Additional notes (for rejected requests)
Understanding the History Table
Columns Explained:
| Column | What It Shows | Example |
|---|---|---|
| Token | Token being refunded | USDT |
| Amount | Quantity of tokens refunded | 72,500.00 |
| Total USD | Estimated USD value at time of request | $72,500.00 |
| Destination | Where refund will be sent (Type, Network, Address) | Wallet - Ethereum - 0x742d…f44e |
| Status | Current request status | Pending / Confirmed / Rejected |
| Requested At | When you submitted the request | Jan 5, 10:30 AM |
Destination Details Display
For Wallet Destinations:
The table shows detailed information about your selected wallet:
Type: Wallet
Network: Ethereum
Label: My Main Wallet
Address: 0x742d35Cc6634C0532925a3b844Bc454e4438f44e [📋]
Features:
- Type Badge: Shows “Wallet” designation
- Network Badge: Shows the blockchain network
- Label: The friendly name you gave the address
- Address: Full wallet address with copy button
- Copy Button (📋): Click to copy address to clipboard
- Changes to checkmark (✓) when copied
- Reverts after 2 seconds
If Address is Long:
- You can click the eye icon (👁️) to view full details
- A modal will show the complete information
- Useful for reviewing before refund is processed
Viewing Additional Notes
For Rejected Refunds:
If your refund was rejected, the admin team provides a reason in the “Additional Note” field.
How to View:
- Rejected requests show the note directly in the table
- Or click on the row to expand and see full details
- The note explains why the refund was declined
Example Rejection Note:
Additional Note:
"Refund request denied due to incomplete KYC verification.
Please complete all required KYC documents and resubmit your
request. Contact support@tradepoint.com if you have questions."
Empty History State
If You Have No Refund Requests:
You’ll see an empty state message:
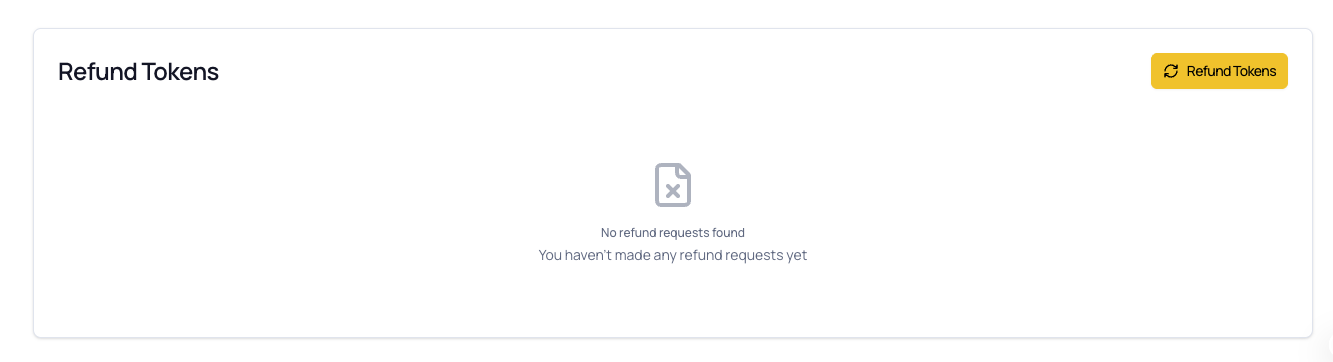
What This Means:
- You’ve never submitted a refund request, OR
- All your previous requests have been cleared from the system
9. After Refund Approval
What Happens When Your Refund is Approved
Immediate Changes:
1. Vesting is Stopped
- Your vesting schedule is zeroed out
- No more tokens will vest daily
- Future token releases are cancelled
2. Unclaimed Balance is Cleared
- Any tokens in “Available to Claim” are removed
- These tokens are returned to the platform
- You can no longer claim them
3. Vesting Status Changes
- Your vesting schedules are marked as “refund” status
- The vesting schedule shows as inactive
- Red “Refund” badge appears in the vesting table
4. Transaction is Initiated
- Admin team processes the refund manually
- Transaction ID is assigned
- Funds are sent to your designated destination address
Receiving Your Refund
Timeline:
- Approval to Initiation: 1-3 business days
- Blockchain Confirmation: 5 minutes to 2 hours (depending on network)
- Total: Typically within 1 week of approval
Where to Check:
- Your Destination Wallet:
- Open the wallet you specified in the refund request
- Check for incoming transactions
- Look for the token you refunded
- Blockchain Explorer:
- Use the transaction ID if provided
- Check on Etherscan (Ethereum), BscScan (BSC), etc.
- Verify transaction status and confirmations
Example Transaction:
Transaction Hash: 0xabc123...def789
From: TradePoint Platform
To: 0x742d35...f44e (Your Address)
Amount: 72,500 USDT
Status: Confirmed (15 confirmations)
What You Keep vs. What You Return
Let’s use our previous example to show what happens:
Before Refund Approval:
Total Allocation: 100,000 tokens
Vested So Far: 32,500 tokens
Already Claimed: 27,500 tokens (in your wallet)
Unclaimed: 5,000 tokens (available to claim)
Unvested: 67,500 tokens (future vesting)
After Refund Approval:
┌─────────────────────────────────────────┐
│  You Keep:                              │
│  27,500 tokens (already in your wallet) │
│                                         │
│  You Return to Platform:                │
│  5,000 tokens (unclaimed)               │
│  67,500 tokens (unvested)               │
│  ─────────────────────────              │
│  Total Refunded: 72,500 tokens          │
└─────────────────────────────────────────┘
Final State:
- ✅ 27,500 tokens remain in your external wallet (yours to keep)
- ✅ 72,500 tokens are refunded to platform (and then sent back to you)
- ✅ 0 tokens remain in vesting (schedule is zeroed)
- ✅ 0 tokens remain unclaimed (balance cleared)
[!IMPORTANT] Confusion Alert: The refund returns your unvested and unclaimed tokens to the platform, and then the platform sends the value back to you (often as the same token or equivalent value). Check with admin for the exact refund terms.
Notification Emails
You Will Receive:
1. Approval Email:
After Receiving the Refund
What You Should Do:
1. Verify Amount:
- Check that you received the correct amount
- Account for any deductions or fees (if applicable)
- Compare with your original refund request
2. Confirm Transaction:
- Verify transaction on blockchain explorer
- Ensure sufficient confirmations (15+ for Ethereum)
- Check that it came from TradePoint’s wallet
3. Update Your Records:
- Note the transaction hash for your records
- Screenshot the confirmation for future reference
- Update your portfolio tracking if applicable
4. Provide Feedback:
- If you experienced issues, report them to support
- Share your experience to help improve the process
What If You Don’t Receive the Refund?
Wait Period:
- Allow at least 24 hours after the “Confirmed” status
- Blockchain confirmations can be slow during congestion
After 24 Hours, Check:
- Correct Wallet:
- Are you checking the wallet address you specified?
- Are you viewing the correct network?
- Blockchain Explorer:
- Use the transaction ID to look up the transaction
- Check if transaction is pending, failed, or confirmed
- Email Notifications:
- Review approval and completion emails
- Check for any error messages
If Still Missing:
- Contact support immediately with:
- Ticket ID (REF-2024-001234)
- Transaction ID (if provided)
- Your destination address
- Screenshots of your empty wallet
- Blockchain explorer screenshots
10. Frequently Asked Questions
General Questions
Q: Who is eligible for token refunds? A: Only users with the refund feature enabled in their account configuration. This is not enabled by default. Contact your admin or account manager if you need access.
Q: Can I refund only part of my allocation? A: No. Refunds are all-or-nothing per token. If you have USDT allocated, you must refund the entire USDT allocation (unvested + unclaimed). You cannot request a partial refund like 50% of your tokens.
Q: What happens to tokens I’ve already claimed? A: Tokens you’ve already claimed and withdrawn to your external wallet are yours to keep. They are NOT included in the refund. Only unvested and unclaimed tokens are refunded.
Q: How long does the refund process take? A: Typically 1-2 weeks from submission to completion, but can vary based on:
- Admin team workload
- Compliance requirements
- Size of the refund
- Network transaction times
Q: Are refunds guaranteed to be approved? A: No. Refunds require admin approval and are subject to platform policies, compliance requirements, and business considerations. Approval is not automatic or guaranteed.
Q: Can I request refunds for multiple tokens? A: Yes, but each token requires a separate refund request. You cannot bundle multiple tokens into one refund request.
Process Questions
Q: Can I continue to claim tokens while my refund is pending? A: Yes, your vesting continues normally until the refund is approved. However, if you claim tokens after submitting the refund, the refundable amount will be recalculated at the time of approval to exclude those claimed tokens.
Q: Can I cancel a refund request after submitting? A: Not directly through the platform. Contact the admin team or support if you need to cancel. Provide your ticket ID and reason for cancellation.
Q: What if I made a mistake in my refund request? A: Contact support immediately with your ticket ID. If the request is still pending, they may be able to modify or cancel it. Once approved, changes are generally not possible.
Q: Can I submit a new refund after one is rejected? A: Yes, if you’ve addressed the reason for rejection. Read the rejection reason carefully and resolve the issue before resubmitting.
Q: Do I need to pay any fees for a refund? A: Refund policies vary by platform. Some platforms:
- Charge no fees (refund full amount)
- Deduct processing fees
- Deduct blockchain transaction fees Check with your admin team for specific fee policies.
Status Questions
Q: Why is my refund stuck in “Pending” for so long? A: Common reasons:
- High volume of refund requests
- Additional compliance checks required
- Admin team understaffed or on holiday
- Your request requires extra verification Contact support if pending beyond 2 weeks.
Q: Can I see who reviewed my refund? A: Generally no, for privacy and security reasons. However, you can see the approval/rejection decision and any notes provided.
Q: What does “Additional Note” mean in my rejected refund? A: This is the admin team’s explanation for why your refund was rejected. It may include:
- Specific issues that need to be resolved
- Policy violations that occurred
- Requirements you need to meet
- Contact information for questions
Q: My refund was approved but status is still “Pending”? A: Status should change to “Confirmed” once approved. If it doesn’t update:
- Refresh the page
- Wait a few hours and check again
- Contact support if status doesn’t update within 24 hours
Technical Questions
Q: What blockchain networks are supported for refunds? A: Refunds are sent to the wallet addresses in your Address Book. Supported networks depend on:
- The token being refunded
- Networks configured for that token
- Your saved addresses Typically: Ethereum, BSC, Polygon, and other major chains.
Q: Can I send refund to an exchange address? A: This depends on the token and network. Generally:
- ✅ Yes, if your Address Book allows it
- ❌ No, if the platform restricts exchange addresses
- ⚠️ Be careful with exchange addresses - ensure they support the specific token and network
Q: What if my wallet address changed after submitting the refund? A: Contact support immediately. If the refund is still pending, they may be able to update the destination. Once processed, it cannot be changed.
Q: Do I receive the same token I’m refunding? A: Usually yes, but this depends on platform policy. Some platforms:
- Refund the exact same token (USDT → USDT)
- Refund equivalent value in stablecoins
- Refund fiat currency equivalent Check with admin for your platform’s policy.
Post-Refund Questions
Q: Can I get my allocation back after a refund? A: Generally no. Refunds are final. Once approved and processed, your vesting schedule is permanently closed. You cannot “undo” a refund and restore your original allocation.
Q: What happens to my account after a refund? A: Your account remains active. You can:
- Continue using the platform
- Participate in other token allocations
- Request future refunds if eligible The refund only affects the specific token allocation you refunded.
Q: Can I participate in future token rounds after a refund? A: Usually yes, unless your refund was due to a policy violation or account issue. Refunds do not automatically disqualify you from future participation.
Q: Will refunding affect my reputation or standing? A: Not typically, unless you abuse the refund system or violate policies. Legitimate refund requests are a normal part of platform operations.
11. Troubleshooting
Issue: “Refund Tokens” Button Not Visible
Symptoms:
- Cannot find “Refund Tokens” button on Portfolio page
- Refund section not showing
- No option to request refunds
Causes & Solutions:
Cause 1: Refund Feature Not Enabled
- Refunds are not available for your account
- Solution: Contact your admin team or account manager to request access. Explain your reason for needing the refund feature.
Cause 2: No Vesting Schedules
- You don’t have any active vesting schedules
- Solution: Wait for admin to assign you a token allocation. You cannot request refunds if you have no vesting schedules.
Cause 3: All Tokens Fully Vested and Claimed
- You’ve completed all vesting and claimed everything
- Solution: This is normal - you have no unvested tokens to refund.
Cause 4: Page Loading Issue
- Browser or cache issue preventing button from showing
- Solution:
- Hard refresh:
Ctrl+F5(Windows) /Cmd+Shift+R(Mac) - Clear browser cache
- Try a different browser
Issue: “KYC Verification Required” Error
Symptoms:
- Click “Refund Tokens” but get KYC error
- Dialog shows KYC verification message
- Cannot proceed past KYC check
Solutions:
- Complete KYC Verification:
- Click “Complete KYC Verification” button in the dialog
- Opens KYC page in new tab
- Fill out all required KYC information
- Upload required documents
- Submit for review
- Wait for KYC Approval:
- KYC review takes 1-3 business days
- Check KYC status in Account > Identity Verification
- Return to refund process after approval
- KYC Already Submitted:
- If KYC shows as “Pending,” wait for approval
- If “Rejected,” review feedback and resubmit
- Contact support if stuck
[!NOTE] See the TradePoint User Account Settings Guide for detailed KYC instructions.
Issue: “Two-Factor Authentication Required” Error
Symptoms:
- Cannot proceed without 2FA
- Modal says “Two-Factor Authentication Required”
- Refund request blocked
Solutions:
- Enable 2FA:
- Go to Account Settings > Security
- Click “Enable Two-Factor Authentication”
- Scan QR code with authenticator app
- Enter verification code
- Save backup codes
- 2FA Already Enabled but Not Working:
- Check that authenticator app is synced (automatic time)
- Try generating a new code
- Ensure you’re looking at the correct TradePoint entry
- Contact support if codes consistently fail
[!NOTE] See the TradePoint User Account Settings Guide Section 3 for 2FA setup instructions.
Issue: “No claimable tokens available” in Token Selection
Symptoms:
- Token dropdown is empty
- Shows “No vesting schedules found”
- Cannot select any tokens
Causes & Solutions:
Cause 1: No Vesting Allocations
- You don’t have any token allocations yet
- Solution: Wait for admin to assign you allocations
Cause 2: All Tokens Have Active Refunds
- You’ve already requested refunds for all your tokens
- Solution: Wait for existing refunds to be processed before requesting new ones
Cause 3: TGE Not Reached
- Your tokens exist but TGE date is in the future
- Solution: Wait until TGE date passes
Cause 4: All Tokens Fully Vested and Claimed
- No unvested or unclaimed tokens remain
- Solution: This is normal - nothing to refund
Issue: “No compatible addresses for this token” Error
Symptoms:
- Destination dropdown shows no addresses
- Message: “No wallet addresses found”
- Cannot select a destination
Solutions:
- Add a Wallet Address:
- Click the Address Book link in the error message
- Go to Account Settings > Address Book
- Click “Add New Address”
- Provide wallet address, network, label, and screenshot
- Verify with 2FA code
- Check Network Compatibility:
- Ensure your saved addresses support the token’s network
- If refunding USDT on Ethereum, you need an Ethereum address
- Add addresses for the correct network
- Refresh Address List:
- Click the refresh button (🔄) in the destination dropdown
- Reloads your Address Book
- Use if you just added a new address
[!NOTE] See the TradePoint User Account Settings Guide Section 4 for Address Book instructions.
Issue: “Invalid TOTP code” Error When Submitting
Symptoms:
- Enter 6-digit 2FA code but get error
- “Invalid or expired code” message
- Cannot complete refund request
Common Causes & Solutions:
1. Code Expired While Typing
- Solution: Wait for the next code (30 seconds) and try again
2. Wrong Code Entered
- Solution: Double-check you’re reading the correct digits from your authenticator app
3. Looking at Wrong Account
- Solution: Make sure you’re viewing “TradePoint” in your authenticator, not another service
4. Phone Time is Incorrect
- Solution:
- Go to your phone’s Settings
- Find Date & Time settings
- Enable “Set Automatically” or “Use Network Time”
- Close and reopen your authenticator app
- Try again
5. 2FA Configuration Corrupted
- Solution: Contact support to reset your 2FA (requires identity verification)
Issue: Refund Request Stuck in “Pending”
Symptoms:
- Refund has been “Pending” for more than 2 weeks
- No status update or communication
- No response from admin team
Solutions:
- Check Timeline:
- Verify how many business days have passed
- Exclude weekends and holidays
- Normal processing is 1-2 weeks
- Review Submission:
- Check that refund appears in your history
- Verify ticket ID is showing
- Ensure submission was successful
- Check Email:
- Look for any communications from admin team
- Check spam/junk folder
- They may have requested additional information
- Contact Support:
- If truly stuck after 2 weeks, contact support
- Provide:
- Ticket ID
- Date of submission
- Token and amount
- Any previous communications
- Be patient and polite
- Escalate if Necessary:
- If no response after 3 weeks, escalate to senior support
- Request status update and estimated completion time
Issue: Refund Approved But Funds Not Received
Symptoms:
- Status shows “Confirmed”
- Email says refund processed
- Funds not in destination wallet
Solutions:
- Wait for Blockchain Confirmation:
- Allow 1-4 hours for network processing
- Check blockchain explorer with transaction ID
- Network congestion can delay confirmations
- Check Correct Wallet:
- Verify you’re checking the right wallet address
- Ensure you’re viewing the correct network
- Example: USDT on Ethereum vs. USDT on BSC are different
- Verify Transaction on Explorer:
- Use transaction ID to look up on Etherscan/BscScan
- Check if transaction is:
- Pending (wait longer)
- Failed (contact support immediately)
- Confirmed with sufficient confirmations (check wallet again)
- Check Wallet Settings:
- Some wallets hide tokens until you manually add them
- Add the token contract address if needed
- Switch networks to find the token
- Contact Support (After 24 Hours):
- If funds still missing after 24 hours, contact support
- Provide:
- Ticket ID
- Transaction ID
- Destination address
- Screenshots of empty wallet
- Blockchain explorer screenshots
Issue: Refund Was Rejected - What Now?
Symptoms:
- Status changed to “Rejected”
- Email notification of rejection
- Refund was declined
Solutions:
- Read the Rejection Reason:
- Check the “Additional Note” in your refund history
- Understand why the request was declined
- Note any specific issues mentioned
- Address the Issue:
- If KYC incomplete: Complete KYC documents
- If policy violation: Review terms of service
- If technical issue: Resolve the problem
- If unclear: Contact support for clarification
- Determine if Resubmission is Appropriate:
- Can you resolve the stated issue?
- Is resubmitting allowed per the rejection note?
- Will circumstances be different?
- Resubmit if Appropriate:
- Fix all issues mentioned in rejection
- Provide additional documentation if needed
- Include a note explaining how you’ve addressed the concerns
- Accept if Necessary:
- Some rejections are final
- Platform policies may prevent certain refunds
- Your vesting continues normally after rejection
Issue: Duplicate Refund Request Error
Symptoms:
- Try to request refund but get error
- Message says “Already have pending refund”
- Cannot submit new request
Cause:
- You already have an active refund request for this token
- System prevents duplicate requests
Solutions:
- Check Your Refund History:
- Look for existing pending or confirmed refunds
- Verify the token matches
- Wait for Current Request:
- Allow existing request to be processed
- Once completed (confirmed or rejected), you can submit a new one
- Cancel Existing Request:
- If you need to change details, contact support
- Request cancellation of the current refund
- Submit new request after cancellation
Issue: Refund Amount Doesn’t Match Expectation
Symptoms:
- Expected to refund X tokens
- System shows different amount
- Numbers don’t add up
Common Causes:
Cause 1: Tokens Vested Since You Checked
- Vesting is real-time and updates daily
- Amount may have changed since you last looked
- Solution: This is normal - system uses current values
Cause 2: You Claimed Tokens Recently
- Claimed tokens are excluded from refund
- Refundable amount reduced by your recent claims
- Solution: This is expected - you keep claimed tokens
Cause 3: Multiple Rounds Confusion
- You may be looking at one round’s total
- Refund includes all rounds for that token
- Solution: Check the refund amount details card for accurate total
Cause 4: Display Rounding
- High precision tokens use many decimals
- Display shows fewer decimals for readability
- Solution: Small differences (<0.001%) are normal rounding
If Large Discrepancy:
- Contact support with:
- Expected amount and calculation
- Actual amount shown
- Screenshots of vesting schedule
- Screenshots of refund request
Need More Help?
If you’re still experiencing issues after trying the troubleshooting steps:
- Check your account settings to ensure all requirements are met
- Review the TradePoint User Manual for comprehensive platform guidance
- Contact support with:
- Clear description of the issue
- Steps you’ve already tried
- Screenshots (blur sensitive info)
- Ticket ID if applicable
- Date and time when issue occurred
When Contacting Support About Refunds, Provide:
- Your ticket ID (REF-XXXX-XXXXXX)
- Token symbol and refund amount
- Current status of the refund
- What you expected vs. what happened
- Any error messages (exact wording)
- Screenshots with timestamps
- Destination address (if relevant)
- Transaction ID (if applicable)
Summary Checklist
Before requesting a token refund:
- Understand what a refund is and when to use it
- Verify refund feature is enabled for your account
- Complete KYC verification and receive approval
- Enable Two-Factor Authentication with authenticator app
- Add at least one wallet address to your Address Book
- Know what you’re refunding (unvested + unclaimed tokens)
- Understand tokens you’ve claimed are NOT refundable
- Prepare for manual review (1-2 weeks processing time)
- Have your 2FA app ready for confirmation
- Double-check destination address before submitting
Quick Reference:
- Refundable: Unvested tokens + Unclaimed tokens
- Not Refundable: Already claimed tokens in your wallet
- Process: Request → Pending → Admin Review → Approved/Rejected
- Approval: Vesting stops, unclaimed cleared, funds sent to destination
- Timeline: 1-2 weeks typical processing time
- Requirements: KYC approved, 2FA enabled, saved wallet address
This guide is maintained by the TradePoint team. Last updated: January 2025